2015-04-04

$1 value cat plushie - slashing price DIY needle felting animal kit from DAISO


I haven't been DAISO ($1 value shop chain) for a while, and when I had a look of their "Handmade" section, I was really surprised that they have variety of beginners' DIY kits. Tiny beading animals, faux leather miniatures, UV resin gel , paper weaving baskets, small needle felt / sheet felt plushies, and more.


I'm interested in but never tried needle felt before, so I got DIY cat plushie kit (includes four colored wool felt, a needle, eye parts, round jump rings, a ball chain, fully illustrated JP/EN instruction) and "needle felt starter kit" (includes a needle felting mat and a needle for felting).


I need to confess that I totally ignored the finishing process of the model of the kit. I didn't use cute eye parts and I'd like to make more dreamy cat with long eyelashes...


Yes it was tough challenge for my very first time! I don't know why but my cat plushie became more defiant face like a punk rock girl. I decorated her with a tiny faux pearl necklace, a satin ribbon bow and light brown Swarovski rhinestone eyes. XD


2014-04-30

makeover dress with free-minded stitches


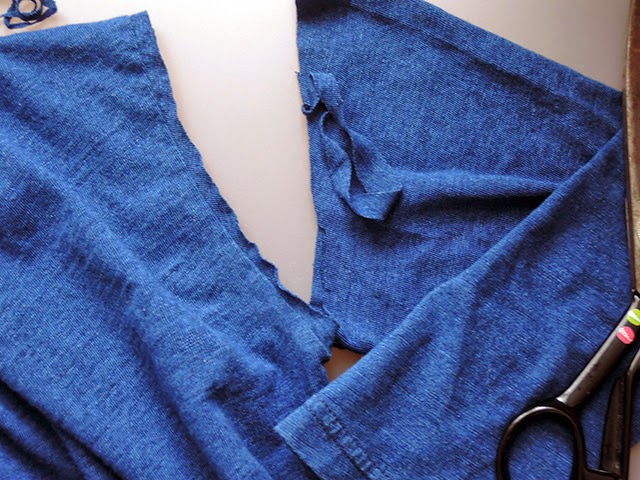
I got a long-sleeved denim-look-alike relaxing jersey dress on clearance sale. Early summer will come to Tokyo very soon, I'd like to cut-off the sleeves and put stitches for some decoration combined with stopping frays.
As always says, I'm really BAD at sewing and stitching! So I decided to use most simple and basic running stitch for this.


The most important thing is choosing lovely threads. Choose different (or same) colors for each stitch. I use 3 different beautiful color Swedish linen threads.


Cutoff the sleeves, leave sleeve fabric half or 1 inches from arm holes. Trim both sleeves (almost) same length.


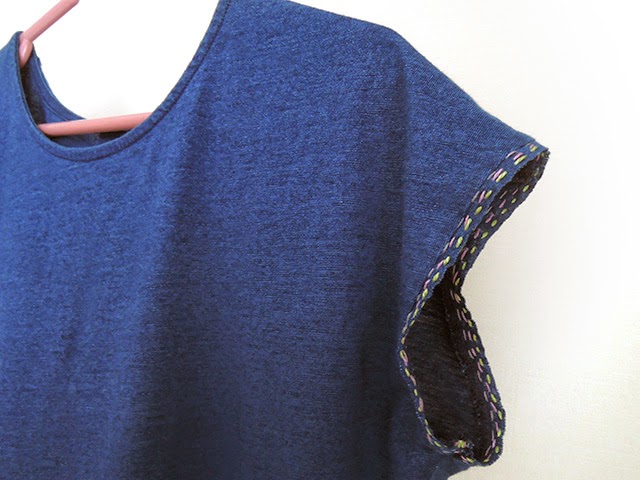
Start stitching. Tie up the thread, and start stitching from bottom of the sleeve. To hem cut-off sleeves, put one or two whipstitch for stopping frays.


Then start running stitches. I put the first stitch line from inside of the sleeve.


Keep stitching! Don't pull the thread strongly, not to shrink dress fabric. And don't forget to tie up the end of the thread.


It's like Japanese traditional Sashiko technique, but more free-minded and easy.
If you can make it more beautiful, please tidy the stitch lines. If you can't (like me,) I think it's absolutely ok. Enjoy! :)

2013-09-07

Report - DYLON COLOR CENTER


This time it's not handmade craft by me, report of the experience of DYLON COLOR CENTER. :)

I got Tsumori's cute pink-beige "Neko-Dot" cashmere scarf last year. I do love it but the color was too similar to my face... to say the truth, it was not nice in me.
I don't want to make it being put in the closet forever. An idea had came into my head...maybe I could change the color of it? At first I thought I'd dye it by myself. But then I found famous dye color company DYLON doing dyeing service in Shinsen (only 1 station from Shibuya).

今回は自分の作ったものではなく、ダイロン・カラーセンターの利用レポートです。:)
去年購入したツモリのピンクベージュのカシミアネコドットストール、お気に入りなのにどうしても色が似合わず…でもクロゼットに仕舞い込むのも悲しいので、染め替えしたらどうか?と思いつきました。自分で染めようと考えていたら、ダイロンが神泉の本社ビルで染色サービスをしているのを知りました。


2 weeks ago I went to DYLON COLOR CENTER and chose the color number 11 Bordeaux from "multi" series.
Shop staff was professional of coloring and showed me some samples. She said it can be softer color and remain cute dots of the scarf. The price depends on weight of the fabrics. This scarf costs 3,000yen to dye.

さっそくダイロン・カラーセンターに相談に行き、サンプルを色々見せてもらって『マルチシリーズ』No.11ボルドーカラーに決定。薄めのカラーにすることでネコドットを残してもらうことにしました。


10 days later they leave me a phone message - it was done. I went to the shop again and re-born coloring of the scarf made me happy! I can't wait the beautiful autumn day to put this on!

約10日後(2週間が目安だそうです)出来上がったと連絡があって再度ショップへ。とても綺麗に染め上がっていて嬉しかったです!今年の秋冬は活躍させられるといいな〜 :D


2013-09-06

Patch Brooch Pin


Recently I got a cute iron-on-patch of my fav anime. I don't want to fix it to only one of my bag or t-shirt. So I changed it to a brooch pin.
It's quite easy! If you have skill of making your own patches (I envy you ;D) it would be awesome work!

=== Materials & Tools ===

- patch (iron-on-patch is easier)
- felt sheet (over 2mm(0.08in) thick is best,  I glued two pieces of 1mm sheet)
- pin
- fabric glue clear type
- thread and needle or super glue

- steam iron
- scissors
- toothpick or tiny spatula

=== Steps ===

1~2. Put a patch on a felt sheet. Cut the felt out with some allowances to the patch.
If your patch is not iron-on type, glue the patch with fabric glue to the felt sheet and dry it.

3. (if your patch is iron-on type) Press the iron with steam on the patch to the felt sheet. Using presser cloth is better.

4. Cut the felt sheet out to contour shape of the patch. place the pin with small felt sheet piece for the mount. 
     If you are more lazy and have super glue , you don't need the mount.

5~6. Put fabric glue to the contour of fixed patch and felt sheet with toothpick or tiny spatula. Dry it.
     It's better not to touch the contour  anywhere, I used cardboard to keep it. You can use anything - pet bottle caps, tiny box...

7~8. Attach the pin. Sew the pin to the mount and fix it by superglue on the back. Or just attach the pin to the back by superglue.

It's done! Enjoy :D

***Don't think about selling when you use copyrighted character patches. Thanks!***

2012-10-26

easy LED flower for Halloween

It's almost Halloween!
You can make easy LED flower in last minutes for nightmare party :)
The technique of making petals are same as jellyfish.
This time I use chemical satin and chiffon. Also these are very flammable! Please take care about that!

materials:
chemical satin, polyester chiffon, fisher line (synthetic fiber thread), conductive thread, 3V button battery, battery box (I use Aniomagic one because it has on/off and looks cute), LED(mine is "candle color"!), felt sheet, beads (mine are 5 Czech glass crystal beads), brooch pin

need:
scissors, pliers (mine are needle nose and round nose), needle (regular and beading needle), candle, matches or lighter, three different size circle-make-things, pencil(not in photo)

Draw and cut 2 circles for each size on satin fabric. And draw and cut a circle each size on chiffon. You'll have 9 circle fabrics.
I'm using wood coaster (it become candle holder later), bracelet, and a flash-light.
Whatever can make circles is ok.

BE CAREFUL!
Light a candle, and hold satin and chiffon circles on your hands to shrink by candle's heat.
Please keep a safe distance from a candle always. This fabric is easy to burn out!
Make it slowly.

Design your flower petals. If you need smaller petal, keep heating it little longer and make it more shrink.

Fun and lazy time to fixing petals.
Stick LED to circle fabrics' center, one by one. Start from smallest one. Both of LED legs must be apart on fabrics (all of fabrics has two holes by LED)
Don't be more lazy! ;D
Stick petals one after another.

Put LED legs down by pliers, angles of ninety degrees.
Longer leg is + (positive electrode), shorter is - (negative electrode).
If you think you'll forget which is which, write on petal back + and - by pencil.
(of course I always forget!!)
Then roll up each legs like small rings carefully.
Now petals are fixed by LED legs.
All the time, LED legs must not contact.

Sew LED legs and battery box by regular needle and conductive thread.
Cut a felt sheet round. Set battery box down center (later, brooch pin comes on upper place). Start sewing from LED + (positive electrode) leg. sew it 2 or 3 times, then sew battery box + (positive electrode) hole 2 or 3 times through felt sheet.
Tie conductive thread, and cut short. And sew - (negative electrode) LED leg and battery hole by new thread. Never contact + and - electrodes!

Test how it works. Put battery and switch on.

Hem the felt sheet by regular needle and fisher line. Sew brooch pin on felt too.
Turn it to front, then sew beads around LED head like stamens by beading needle and fisher line.

Finished! You can put it on your bag or...
arrange it on scrunchie with some ribbons like a bracelet!
Happy Halloween!

2012-10-23

How to make... jellyfish!

People asked me how to make jellyfish accessories when I blogged these on 8tokyo. And yes I'm lazy enough..., it was two years ago!! Sorry too late to share this.

How to make them is very simple and easy, but slightly dangerous. Please make it carefully!! Chiffon fabrics "burn" well. and of course candle is hot!
And please keep fresh air into your room while you're making.
materials:
polyester chiffon, decorating materials (sequin, ribbon, rhinestone, tiny metals...), fishing line (synthetic fiber thread), brooch pin and jump rings
need:
candle, scissors, two different size circle-things, needle, pencil, matches or lighter, super glue

Draw and cut 2 bigger circles and 1 smaller circle. I'm using wood coaster (it become candle holder later), and a bracelet. And cut 1 square.
And make slits to square one and smaller circle.

BE CAREFUL!
Light a candle, and hold chiffon on your hands to shrink by candle's heat. Please keep a safe distance always. This fabric is easy to burn out! Make it slowly.

Roll up the square one, and sew the place no slits by fisher line. Then put the needle out from top, and sew all of jellyfish parts together.
You need simple jellyfish? Congrats, finished!

Decorate jellyfish with sequin, ribbon, rhinestone, tiny metals.. or more.
Also you can roll up ribbons or silk/metallic strings when you make axis.

Attach the brooch pin to axis if you want. Using jump rings makes your jellyfish more "movable". That's all! Enjoy! :)


2012-05-11

yeti necklace display stand

I wanted to get a necklace display stand for a while.
But these are expensive and not so cute always.

I always make cat motif accessories for necocoa Etsy shop, and imagined if fluffy snow white yeti girl (or guy (^_-)) wears these, it may be funny and cute.Then I remember the words... "if you can't find what you want, you can make that!"

ネックレススタンドがずっと欲しいけど、高いし大抵あんまり可愛くない…。
necocoa Etsyショップではいつもねこモチーフのアクセサリーや雑貨を作ってるから、まっしろでふわふわのイエティの子がつけてくれたら可愛いかも!と想像してみたり。
フェイクファーのネックレススタンドなんてなさそう?なら作っちゃおう!と思いました。

Here's how to make "yeti necklace display stand" :)


materials :
cardboard (mine is Amazon one! ;P)
faux fur fabric
fabric for back side (mine is polka dot cotton)
batting
superglue
double-sided tape

材料:
丈夫な厚紙か段ボール(アマゾンさんの荷物に入ってたのにした)
フェイクファー
裏側用の布(チョコ×ピンク色の水玉コットンにした)
キルト芯
接着剤
両面テープ

It is easier than Halloween Ghost Cat Charm.
Cut the shape of neck stand out, trace the shape to faux-fur and back fabrics.
And cut these out.
Faux-fur should be bigger than cardboard!! (check the pic no.6)

ハロウィンねこおばけチャームよりはずっとカンタンです。
段ボールをスタンドのカタチに切り抜いて、フェイクファーと裏布に型を写して、切り抜きます。フェイクファーは段ボールよりふたまわり位大きく切り抜きます。(写真6参照)


Cut the batting smaller than cardboard, and stick it by double-sided tape (check the pic no.5).
Then put faux-fur on there, turn it back,  put double-sided tape around of cardboard to stick the faux-fur.
Back side fabric should be smaller, adjust size with pinking shears on cardboard.
Put some superglue on cardboard, and stick the back fabric. Dry it 1 - 2 days.

キルト芯を段ボールよりひとまわり〜ふたまわり小さく切り抜いて、両面テープで貼付けます。(写真5参照)
そこにフェイクファーを置いて裏返し、段ボールの周りに両面テープをぐるっと貼って貼付けます。裏布はファーより小さめのほうがいいので、ピンキング鋏で大きさを調整しておきます。
段ボールに接着剤を塗って裏布を貼付けます。1 - 2日乾燥させて完成!